Followers

Powered by Blogger.
Showing posts with label how to. Show all posts
Monday, November 7, 2011

Versace inspired bracelet DIY

 Gold and chains are the perfect ingredients for a luxury bracelet. I istantly loved the bracelet designed by Donatella Versace for H&M and while we wait for the collection to finally reach the stores, why don't make our version of it? You only need gold chains, a wide clasp and a big button!

L'oro o almeno il dorato è l'ingrediente indispensabile per un gioiello che abbia un aspetto lussuoso. Tra gli accessori disegnati da Donatella Versace per il marchio H&M uno in particolare mi ha colpito subito ed è il bracciale con le catenelle. Mentre aspettiamo che finalmente la collezione venga distribuita nei negozi ecco un tutorial veloce che reinterpreta il braccialetto. Vi servono: catenelle, una chiusura e un bottone e il bracciale è presto fatto.


the inspiration:Versace fo H&M
 il bracciale Versace for H&M
 
Aren't buttons beautiful? They can make incredible jewellery almost on their own. I found this big gold button at the haberdashery, you can choose any button you like.The variety is almost infinite and you'll be tempted to buy them all.
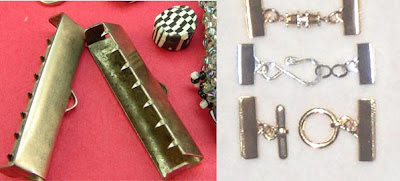
Here's the list of supply needed: a piece of metallic wire, a gold chain ,a button, a clasp like the ones you see below. They are pretty common but my local shop didn't have it so I had to diy my own with a metallic cap.

I bottoni sono davvero bellissimi e possono diventare dei gioielli unici. Io ho acquistato questo grande bottone dorato, voi scegliete quello che più preferite. La scelta è davvero molto ampia e una volta entrate in merceria sarete tentate di comprarli tutti!
Prendete: un filo metallico, una catenella dorata, un bottone, una chiusura per bracciale come quelle che vedete qui sotto. Il mio negozio di riferimento le aveva finite quindi ho dovuto "fabbricare" la mia con un un tappo di lamiera.


I just laid down the chain and tried the button on: as you can see the bracelet looks already done.
Measure your wrist and cut the chain in pieces of the same lenght; then attach the botton at the center with a piece of metallic wire. Using the pincher press the clasp at the ends to block the chains and you've done!

Ho sistemato la catena sul tavolo e ci ho poggiato sopra il bottone. Come potete vedere il bracciale sembra già fatto! Misurate il polso e tagliate la catenella in pezzi della stessa lunghezza. Legate il bottone alla catenella con un pezzo di filo metallico. Inserite la chiusura e schiacciatelasulle catenella. Avete finito!


what i did to make the clasp: I cut 2 rectangular pieces from the cap then I pierced it using a nail. I used a hook  to connect the chain to the metallic plate an then i pressed it down using a pincher.
Come ho fatto a far la chiusura? Ho ritagliato due rettangoli dal tappo e li ho bucati usando un chiodo. Con dei gancetti ho connesso la lamiera alle catenelle e ho poi schiacciato la lamiera con la pinza.

Saturday, October 29, 2011

Cut out shirt tutorial


Here's the shirt tutorial. I took a real man shirt and then I pinched and pinned it around the waist to make it more fitted. You can choose any shirt and then follow the 3 steps to cut it out.

Come promesso ecco il tutorial per realizzare la camicia con inserti in tulle. Io ho traformato una vera camicia da uomo e ho creato due pence sul davanti per renderla più avvitata. Voi scegliete la camicia che più preferite e seguite i 3 step per trasformarla.


Wear you shirt and mark out with a pin where you want the see throught part to begin. Lay down your shirt and make a loose stitched  line that will help you to cut straight.

Indossate la camicia e appuntate uno spillo sul davanti per segnare il punto da cui iniziare a tagliare. Partendo da lì fate un'impuntura da parte a parte che vi aiuterà a tagliare dritto.

 Cut the shirt : start from the front, go around the shoulder and down to the botton line. Leave 1 cm of fabric around the edge and then fold that edge to obtain a neat border.

Tagliate la camicia: cominciate dal davanti, proseguite intorno alla spalla e poi tornate giù intorno la linea dei bottoni. Ricordatevi di lasciare un 1 cm di stoffa intorno all'area tagliata. In un secondo momento piegate quel bordo ottenendo così un orlo ben rifinito.


Reverse the shirt.
Take your light weighted tulle and pin it over the edge of the cut part.
The good thing is that you don't need any pattern, just pin the tulle on and pay attention that the tulle is well stretched out.
Now sew the tulle on the shirt, cut the excess tulle around the edge and you've done!


Mettete la camicia a rovescio.
Prendete un tulle molto leggero e appuntatelo con degli spilli sulla parte tagliata.
Non vi servirà alcun modello fate solo attenzione che il tulle sia ben steso così non farà pieghe.
Cucite il tulle sulla camicia e tagliate quello  in eccesso ai bordi e avete finito!
Friday, August 26, 2011

How to fix a broken eyeshadow

 How many times happens to break an eyeshadow? We have to clean everything up and then tens of dollars go into the trash. Just few days ago I have broken an eyeshadow in my favorite shade of green  and I thought: is it possible that it can't it be fixed? It's only pressed powder. So I searched for a tutorial on the internet and  I found the solution!


Siamo lì che ci trucchiamo, un attimo di distrazione ed ecco che l'ombretto cade per terra rompendosi in mille pezzi. Così decine di euro finiscono nel cestino. Proprio l'altro giorno senza volerlo ho rotto un ombretto della sfumatura di verde da me preferita e ho pensato che alla fine è solo polvere pressata, possibile che non si possa riparare?
Così ho cercato la soluzione su internet e credo di averla trovata!


 you only need a few drops of alcohol
avete bisogno solo di qualche goccia di alcol
pour the alcohol into the eyeshadow
versate qualche goccia di alcol nell'ombretto

take a piece of tissue paper and press down over the powder with a flat surface (ideally big as the eyeshadow), really press!

prendete un pezzetto di carta o di stoffa e premete la polvere con una superficie piatta, io ho usato un tappo di bottiglia,premete con forza
the powder is now well pressed

ed ecco la polvere  nuovamente pressata

I tried again with again with the orange eyeshadow
i'll leave them open for a few days to allow the alcohol to evaporate

lascerò gli ombretti all'aria qualche giorno per permettere all'alcol di evaporare completamente

I'm pretty satisfied with the result, I've turned the eyeshadow upside down and the powder stayed in place.
Here's the full video that teached me this technique:

Il metodo funziona, anche capovolti gli ombretti  mantengono la forma
Qui sotto trovate il video dal quale ho imparato questa tecnica


Monday, August 22, 2011

Sidebar slideshow tutorial


animated gif maker

Joelyne blogger and fashionista of The Sidney Girl asked me to do a little tutorial about the slideshow you can see at the sidebar showing my diy projects.
This slideshow is a gif image built using an online gif maker.
Let's make a slideshow together, I will guide you step by step.
The tutorial awaits you right after the jump.


        click Picasion.com  this is the page you'll see


here's the result!
http://i.picasion.com/pic43/e5b95263fa89676c54d977d52aaa6f69.gif
(some pics from Prada latest ad campain: hey this is still a blog about fashion)
At this point you'll be able to save the gif image on your desktop and then you'll find all the links you need to embed it on your blog. I hope you'll find this little tutorial helpful!

Monday, July 11, 2011

Versace dress DIY: the making

 The basic shape of the dress can be obtained in a number of ways, an easy one can be to use a dress you own (with no stretch) and fits fine as a guideline. If you choose to do this remember to cut the front and the back of the dress leaving enought fabric around the borders (seam allowance) to adjust the fit.
The back of the dress arrives till the armpit.

Ci sono molti modi per ottenere il vestito base. Uno di questi può essere quello di utilizzare come modello un vestito semplice che già avete. Se decidete di tagliare il davanti e il dietro del vestito seguendo questo metodo ricordare di lasciare abbastanza stoffa ai bordi per poter fare delle modifiche quando proverete il vestito.
Il dietro del vestito è stato tagliato per arrivare sotto l'ascella.
I've sewed the front and the back of the dress together.
 This is what i've done to obtain the neckline:
you have to cut a curved piece of fabric
i've used a rope to define the neckline on the dress and around the neck
i've traced this curve over a piece of paper and then adjusted the width


Dopo avere cucito il davanti e il dietro del vestito questo è il procedimento per fare lo scollo:
ho utilizzato una corda per segnare il percorso della stoffa sul davanti del vestito fin dietro al collo
ho ricalcato questa linea su un pezzo di carta e poi ho aggiustato la larghezza del pezzo.
i've cut two curved pieces of satin fabric and i've stitched them together
then i've turned the piece over and pressed it with the iron to make the seam flat
then i've cut the excess border of the dress and inserted the satin neckline into the fluffy fabric

Ho tagliato due pezzi curvi di raso e li ho cuciti insieme da un lato.
 Li ho voltati e ho schiacciato la cucitura con il ferro da stiro
Ho poi tagliato l'eccesso di stoffa dal vestito e ho inserito il bordo in raso.
I've then sewed the satin onto the fluffy fabric keeping the seams in the inside
i've finished pressing the satin with the iron
The band on the back is a lot easier, it's just a rectangular piece of fabric.

Ho cucito il bordo sul vestito lasciando le cuciture all'interno e ho finito schiacciando tutto con il ferro da stiro.
Lo stesso procedimento è stato eseguito per la fascia sul retro del vestito tagliando un pezzo rettangolare di raso.


Tuesday, June 21, 2011

DIY Neon clutch inspired by Christopher Kane

 the inspiration : Christopher Kane neon lace clutch
le borsette di Christopher Kane

the finished bag
la borsa finita


 mix the color with water and dip the lace into it: this is going to be messy so use a pair of gloves
squeeze the excess out and put the fabric to dry over a newspaper

mischiate l'acqua al colore e immergeteci il pizzo; strizzate poi il pizzo rimuovendo l'eccesso di colore
vi consiglio di indossare i guanti

 here's the dried lace,it mantains its flexibility (if you want you can spray it with a sealer)
dilute the acrylic color only a little to obtain a really saturated color

ecco il pizzo asciutto se volete potete fissare il colore con uno stray plastificante
per ottenere un colore vivace diluite il colore con poca acqua

sew the orange lace over a black piece of fabric
fold the fabric in half leaving the lace on the inside and sew along the edges obtaining the bag shape
add a zipper at the top 
attach a piece of rope to the zipper puller and you've done!

cucite il pizzo arancione sopra la stoffa nera
piegate la stoffa a metà lasciando il pizzo all'interno e fate due cuciture ai lati ottenendo la borsetta
aggiungete una zip sul lato aperto
potete legare una corda al cursore della zip per indossare la borsa al polso e la borsa è completata!

Christopher Kane clutches are colorful and fun,perfect for summer! They're made of laser cutted leather obtaining an effect that gives the illusion of lace!
To own a similar clutch i've painted a piece of white lace in orange and crafted a simple clutch!
 To make one you'll need only a small piece of white lace and black fabric, remainder pieces will be fine!
My clutch is 27cmx17cm.

Le borsette colorate pensate da Christopher Kane sono perfette per l'estate! Sono in pelle tagliata al laser creando l'illusione del pizzo. Per farne una simile basterà tingere del pizzo bianco con del colore acrilico e poi sovrapporlo ad una stoffa nera.
 La borsetta che ho realizzato è 27cmx17cm.

Tuesday, June 7, 2011

DIY idea: mini + maxi skirt combo


Asos skirt

Maxi skirts are a must this season. Is it a trend anyone can pull off? In my opinion maxi skirs will look best on tall,lean girls,so what we can do? This asos skirt is the solution. Basically it's a short skirt with a maxi skirt over it in a sheer fabric. I think it adds a lot of mistery to the outfit and neutralizes the disadvantages of a maxi skirt (that makes legs look shorter). Plus we can copy this look at home. We'll take a rectangular piece of sheer fabric wider than the hips width,fold it in half and make a vertical seam on one side,now we'll obtain a "tube" . We'll then put an elastic band at the waist and the skirt is done. We'll wear it over a short skirt and the look is completed.

Le maxi gonne sono un must di questa estate ma non tutti le possono indossare! Sicuramente faranno più figura su ragazze alte e magre,come fare allora? Questa gonna di Asos è la soluzione. Praticamente è una gonna lunga fatta di una stoffa trasparente indossata sopra una gonna corta. Secondo me questa opzione aggiunge mistero al look neutralizzando gli svantaggi della gonna lunga (che tende ad accorciare le gambe). Per copiare questo look a casa basterà acquistare un rettangolo di stoffa trasparente più largo della circonferenza fianchi e lungo fino ai piedi. A questo mettete la stoffa doppia e fate una cucitura verticale da un lato e otterrete un "tubo". Cucite un elastico in vita e la gonna è fatta. Completate il look indossando la gonna lunga sopra una mini che già avete.
Saturday, June 4, 2011

The straw bag DIY tutorial

to see more pics of the finished bag click here
per vedere altre foto della borsa finita cliccate qui

you'll need:
  • the straw placemats as a base
  • satin ribbons to decorate the flap
  • gros grain ribbon
  • beads and sequins
  • silver thread
  • 2 meters of chain to make the strap
  • eyelets

avrete bisogno di:
  • tovagliette americane di paglia
  • nastro di raso per decorare la pattina
  • grosgrain
  • perline e paiettes
  • filo argentato
  • 2 metri di catena dorata per la tracolla
  • occhielli

the pattern,click on the images to see them bigger.
il modello, cliccate per vederlo più grande

Sew all the pieces leaving the fringes on the outside
cucite tutti i pezzi lasciando sporgere le frangie

i've boughts some meters of satin ribbons to decorate the flap, this way it will shine under the light
i've chosen 2 different tones of blue and then a shiny silver one

ho comprato qualche metro di nastrini di raso per decorare la pattina ho scelto due tonalità di celeste e un filo argentato
i've weaved the silk ribbon into the straw flap with the help of a pin used as a replacement of the needle;i've alterned the colors.
Then i've added the silver ribbon onto the body of the bag and sides too.

Ho intrecciato il filo nella trama della borsa con l'aiuto di uno spillo che sostituisce l'ago
In this pic you can see the different ribbons inserted into the texture of the flap.
To keep every ribbon in place i've handstitched a quilted pattern with a silver shiny thread and i've added some random beads.

qui potete vedere i nastrini inseriti nella paglia.
Per tenere tutti i nastri al loro posto ho ricamato a mano una trapunta con il filo argentato e ho aggiunto qualche perlina qua e là


now to add more details i've used a gros grain ribbon and i've handstiched onto it some beads and sequins and little pieces cut from the placemats with the silver thread.
Then i've placed the gros grain border onto the flap of the bag.

per aggiungere ulteriori dettagli ho decorato un nastro di gros grain con perline e paiettes e piccoli pezzettini di paglia,ho cucito il bordo di gros grain sul davanti


the flap almost finished
now it's time to put the bag together, i've sewn the flap onto the body of the bag then i've added the eyelets needed to add the chain strap.

per mettere insieme la borsa infine bisogna cucire la pattina sul corpo della borsa,aggiungere gli occhielli per attaccare la tracolla

then i've weaved a blue satin ribbon into the chain strap and the bag it's finished!
This bag required a lot of work but as you can see its beauty it's all in the details.

Ho intrecciato un filo di raso anche nella catenella e la borsa è finalmente finita.
Questa borsa ha richiesto molto lavoro ma come potete vedere sono proprio i dettagli a renderla preziosa.
Related Posts Plugin for WordPress, Blogger...

Popular Posts

Total Pageviews

My Zimbio My Ping in TotalPing.com

About Me

My Photo
Youth Pangkahkulon
View my complete profile