Followers

Powered by Blogger.
Showing posts with label do it yourself. Show all posts
Friday, November 11, 2011

DIY idea: pleats


Pleated skirts are back in fashion and since Donatella Versace included them in her collection for H&M they went right in my diy list. A pleated skirts should be not too difficult to make and I hope to be back to you soon with a tutorial to diy a pleated skirt and be party season ready!

Le gonne a pieghe sono tornate di moda e da quando Donatella Versace le ha incluse nella sua collezione per H&M sono finite nella mia lista dei modelli da realizzare. Spero di potervi presto aggiornare con un tutorial per realizzare una gonna a pieghe da sfoggiare sotto le feste natalizie.
Saturday, October 22, 2011

Versace inspired jeans DIY

DIY jeans
white altered blouse (a diy in progress)

I've been dreaming about a micro studded cloth for a while but the idea of inserting each mini stud by hand was just unrealizable until I found these "beads in a bottle" (doesn't it sound like something came out from Wonderland?). It's a gummy product you can squeeze onto fabric and that makes a ball that looks like a bead.  I found my "micro studding machine"! I picked the metal colors series and I started "to stud" a pair of black jeans. The inspiration is Versace. I decorated them around the lateral seam with the greek fret then I added a spiral on the front.

Ho sempre desiderato possedere un abito decorato con mini borchie ma l'idea di applicarle manualmente una ad una era semplicemente non realizzabile fino a quando ho trovato una ragionevole alternativa: perline in bottiglia (dal nome sembra un oggetto proveniente dal paese delle meraviglie). E' un prodotto viscoso che può essere applicato sulla stoffa e forma una pallina dall'aspetto di una perlina: una perfetta "macchina borchiatrice"! Ho scelto il prodotto in colori metallici affinchè la perlina sembrasse una borchia. L'ispirazione è Versace, ho decorato i pantaloni con una greca intorno alla cucitura laterale e ho aggiunto dei decori sul davanti.


a life size view of the pattern I drew, the grid step is 1 cm wide
il disegno della greca, il quadretto è largo 1 cm
I drew the pattern onto the trousers with a chalk
ho disegnato la greca sul pantalone con un gessetto
the studding machine gun is armed
 la "borchiatrice" armata e carica
 the first studs
le prime borchie
the spiral: finished and dried
la spirale finita ed asciutta

If you want to decorate smaller areas rhinestuds are a good alternative to "beads in a bottle". They are small metallic studs that can be ironed onto the fabric, you can buy ready to use decorations or loose ones.

Se volete decorare aree più piccole le borchiette piatte sono una valida alternativa alle "perline in bottiglia" . Si incollano sulla stoffa stirandole e si possono acquistare in merceria interi decori già pronti o sfuse.

A special thanks to Beth Livesay and Stampington for sending me a bag full of these special beads for my fashion experiments. Visit Beth's blog: Couture over Coffee

Un ringraziamento particolare a Beth Livesay e a Stampington per avermi mandato un pacchetto pieno di "perline in bottiglia" per i miei esperimenti di moda. Visitate il blog di Beth: Couture over Coffee.

my stock of liquid beads, still plenty left for my future projects
Thursday, October 13, 2011

Aviator sunglasses DIY


I finally found a nice white leather to customize my mirror aviators!Want a pair? I'll post the tutorial tomorrow! Have a nice day guys!
Monday, October 3, 2011

DIY idea: trompe l'oeil necklace


What can a fashionista do when hard times comes and diamonds and crystals become too expensive? Draw them!
I think this trompe l'oeil necklace is funny an unusual. Want to make one? Print the image of a necklace on transfer paper and iron it on a canvas or get creative and hand draw a necklace onto a canvas to obtain a funky and underground effect.

Cosa può fare una fashionista quando i tempi impongono rigore e diamanti e cristalli diventano lussi inaccessibili? Disegnarli! Non trovate anche voi che questa collana effetto trompe l'oeil sia carina? Se volete averne una simile basterà stampare l'immagine di una collana sulla carta iron on transfer e stirala sul cotone oppure si può disegnare a mano con un pennarello per la stoffa un collier ottenendo un effetto più funky e underground.
Saturday, October 1, 2011

Iconic jewellery holder DIY


How many times you asked yourself: what would she wear? Anyone has an icon whose style inspires us so I thought: why don't let her wear our jewellery? This is how the idea of this jewellery holder was born.
If you like it and want to make one yourself then follow me.

Quante volte ci siamo chieste: lei cosa indosserebbe? Tutte noi abbiamo un'icona il cui stile ci ispira, perchè non materializzarla nel nostro appartamento e farle indossare i nostri gioielli così da creare un portagioielli utile che arredi? Se vi piace e volete sapere come realizzarne uno allora seguitemi.


Print your icon: choose a pic of your muse and print it big onto a piece of carboard
Stampa la tua icona: scegli una foto della tua musa e stampala su un cartoncino


 Cut out the icon
Ritaglia la sagoma


Place the shape onto a piece of pressed cardboard and trace the contour
Sovrapponi alla sagoma ad un foglio di cartone pressato e traccia il contorno


Cut a rectangular piece of pressed cardboard, this will enable the shape to stand tall.
Cut a piece of gros grain longer than the rectangular piece (15-20 cms longer) and glue it at its centre

Tagliate una forma rettangolare dal cartone pressato, servirà a mantenere l'icona in piedi
tagliate un pezzo di gros grain più lungo del rettangolo di 15 cm e incollatelo sul rettangolo

Paint the back of the pressed cardboard
Glue the rectanguar piece at the back of the pressed cardboard
glue the gros grain at the front of your shape
It's just like a frame
now it's time to glue the printed icon onto the shape and you've done

Dipingete il retro della sagoma e incollateci il rettangolo
ora incollate l'altra l'estremità del gros grain sul davanti della sagoma
è come una cornice!
Incollate ora il poster dell'icona sul davanti della sagoma, è fatta!


Now pierce the icon image wherever you want and place your jewellery into these holes
Your new jewellery holder is ready!


Con una puntina bucate la sagoma dove volete e infilateci i vostri gioielli, il vostro nuovo porta gioielli è pronto!


Here's the iconic jewellery holder packed and ready to make a little gift for my favorite cousin!
Ed ecco il portagioielli incartato e pronto per essere donato alla mia cuginetta preferita!
Sunday, September 25, 2011

What if sidereal space was a jewel?


The diamond is something perfect both for its brightness and cut. The necklace was born to emphasize the shape of a diamond, a stone bright as the stars. It is set at the centre with four mirrors reflecting its light around the space. They give a tridimensional dimension to the necklace and they look a little bit like solar panels.
The inspiration is both the sidereal space and the future. The bracelet is obtained with the repetition of a simple shape and it reflects all the rainbow colors when explose to the light.
What do you think of the result?


Il diamante è la perfezione: per lucentezza e taglio. La collana nasce con l'idea di dare risalto alla forma del diamante,una pietra luminosa come le stelle. E' posto al centro della collana con quattro specchi che ne riflettono la luce. Danno tridimensionalità alla struttura e l'aspetto di un satellite. L'ispirazione è sia lo spazio profondo che il futuro. Il bracciale è ottenuto come ripetizione di un elemento base e riflette i colori dell'arcobaleno quando è esposto alla luce. Che ne pensate?


the inspiration: satellites, shiny stars, the future,diamonds
Sunday, September 18, 2011

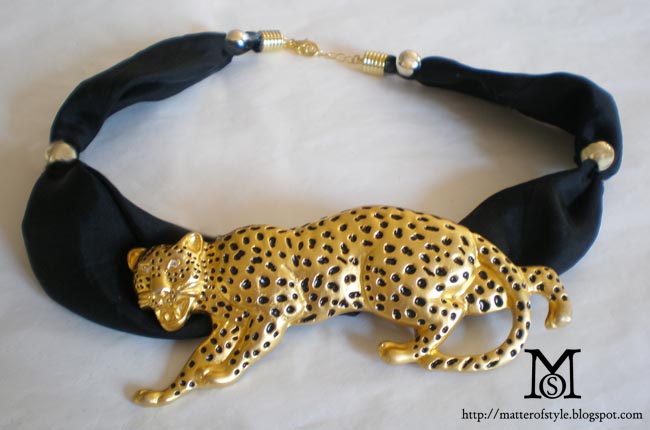
Leopard scupture necklace DIY


I couldn't stop thinking at Raspini's necklace. How could I make a similar one on a budget? One day the answer came into my mind: using a belt buckle! They come in various shapes and I chose this gold leopard to adorn my neck. I used a piece of fabric and a few beads to make the collar and then I added a closure!

La collana di Raspini è un vero capolavoro! Con un po' di ingegno e creatività si può realizzare una collana altrettanto imponente con una fibbia per cintura. Le fibbie per cintura sono disponibili in molte forme, io ho scelto questo leopardo dorato come centrale. Ho poi utilizzato un ritaglio di stoffa e una manciata di perle dorate per realizzare il resto della collana.


the belt buckle
I folded the piece of fabric

I inserted the fabric into the buckle and blocked it with metallic wire
I added the beads  
and the closure is the final touch!
Tuesday, September 13, 2011

Bananas bag DIY

I think that the Prada banana print looks like the bananas are popping out of the fabric so I wanted to make this effect real and I decided to do a fun bag with "banana fringes".

 Guardando la stampa di Prada,le banane sembrano proprio venir fuori dalla stoffa! Ho deciso divertirmi a rendere questo effetto reale e a confezionare una borsetta con le banane a mo di frange.


 the inspiration:Prada banana skirt
l'ispirazione: la gonna di Prada
I used an heavy yellow cotton,fabric pen,scissors,adhesive canvas,wooden beads
Cotone pesante,penna per la stoffa, forbici,telina adesiva,perline in legno

On the back of the fabric I've ironed an adhesive fabric so the cotton won't unthread
Ho incollato con il ferro della telina adesiva così il cotone non sfilerà
I've cut many pieces of cotton in the shape of bananas
A questo punto ho tagliato tanti pezzi di cotone dalla forma di banana
I used a fabric pen to draw the outline
Ho tracciato i contorni con una penna per la stoffa

I've cut the bag in a "fish bowl" shape and I've pinned onto it all the bananas
Ho deciso di dare alla borsa una forma arrotondata e ci ho appuntato con degli spilli tutte le banane

I've used a few big wooden beads to make the handle.
Alla fine ho usato delle perline in legno molto grandi per realizzare il manico della borsa.
Sunday, September 11, 2011

DIY Glitter inspiration

shoes by Roger Vivier via Vogue
Ok I admit I might be a little obsessed with glitters these days. In my defence I have to say that they seems to go well with everything! I put my eyes on this pic taken during Vogue fashion night out in Milan: these shoes look fantastic! White glue and a bottle of glitters can make a miracle!

Ok, devo ammettere di essere un tantino ossessionata dai glitter ultimamente. Cosa possiamo farci se sembrano valorizzare qualunque capo! Guardate queste scarpe fotografate durante la Vogue fashion night out, non sono fantastiche? Ecco il miracolo che una bottiglia di glitter e un po' colla vinilica possono fare!
Friday, September 2, 2011

DIY idea: the unexpected jewellery holder


Take all your vintage pendants and brooches and sew them one after another to make this unusual jewellery holder! This one is from Chanel 2008 collection. Too difficult? An eaasier version of this jewelled top can be to pin all the vintage brooches onto a nude or pink top, the wow effect is assured!
Saturday, August 20, 2011

Studded statement jewelry DIY


I am loving so much my new shoes that looking at them again and again I had the idea of making a statement jewel inspired by them.  For this jewel I used bias tape. I've studded it and then sewed it. What do you think of the result?
I hope you are all enjoying your holidays!


Le mie scarpe si sono trasformate in una fonte di inspirazione per un nuovo gioiello. Ho usato lo sbieghino, ho aggiunto le borchie e poi l'ho cucito. Che ne pensate?
Spero che vi stiate godendo qualche giorno di riposo, Buone Vacanze a tutti!
Monday, August 8, 2011

Valentino inspired studded shoes DIY


the shoes as i bought them
le scarpe prima del trattamento
the inspiration: Valentino studded shoes
a pair of shoes
a long belt
gold studs

un paio di scarpe
una cinta
borchie a volontà
to make the pattern of the border of the shoes i've wrapped them with plastic film

per fare il modello dello scollo della scarpa l'ho avvolta con la pellicola

I've marked the border
ho ricalcato il bordo

I've taken off the plastic and adjusted its width

ho tolto la plastica dalla scarpa e regolato la larghezza del modello
I've cut the leather following the pattern
Ho ritagliato la pelle seguendo il modello

I have added the studs
Ho aggiunto le borchie
I tried the piece onto the shoe
Ho fatto la prova del pezzo sulla scarpa
I've folded and glued the border
Ho ripiegato e incollato i bordi
I've tried on the shoe and wrapped my foot with paper and scotch
Ho infilato la scarpa e ho avvolto il piede di carta e l'ho fermato con lo scotch
I've drawn the straps onto the pattern
Con un pennarello ho disegnato la posizione dei laccetti

And this is the pattern
Ecco il modello della scarpa

On the inside of the belt you can see that the borders are folded and glued. I've unglued them and added the studs to obtain a well refined straps

Sul lato interno della cintura potete notare che i bordi sono ripiegati e incollati, basterà scollare i bordi e aggiungere le borchie per ottenere dei laccetti ben rifiniti


At this point i've followed the pattern and sewed the straps together
A questo punto ho seguito il modello e ho cucito i laccetti insieme

I've then glued everything onto the shoes and added press stud buttons!
Ho incollato tutto sulla scarpa e aggiunto dei bottoni automatici per fissarle alla caviglia!
Related Posts Plugin for WordPress, Blogger...

Popular Posts

Total Pageviews

My Zimbio My Ping in TotalPing.com

About Me

My Photo
Youth Pangkahkulon
View my complete profile