Followers

Powered by Blogger.
Showing posts with label diy jewelry. Show all posts
Saturday, October 1, 2011

Iconic jewellery holder DIY


How many times you asked yourself: what would she wear? Anyone has an icon whose style inspires us so I thought: why don't let her wear our jewellery? This is how the idea of this jewellery holder was born.
If you like it and want to make one yourself then follow me.

Quante volte ci siamo chieste: lei cosa indosserebbe? Tutte noi abbiamo un'icona il cui stile ci ispira, perchè non materializzarla nel nostro appartamento e farle indossare i nostri gioielli così da creare un portagioielli utile che arredi? Se vi piace e volete sapere come realizzarne uno allora seguitemi.


Print your icon: choose a pic of your muse and print it big onto a piece of carboard
Stampa la tua icona: scegli una foto della tua musa e stampala su un cartoncino


 Cut out the icon
Ritaglia la sagoma


Place the shape onto a piece of pressed cardboard and trace the contour
Sovrapponi alla sagoma ad un foglio di cartone pressato e traccia il contorno


Cut a rectangular piece of pressed cardboard, this will enable the shape to stand tall.
Cut a piece of gros grain longer than the rectangular piece (15-20 cms longer) and glue it at its centre

Tagliate una forma rettangolare dal cartone pressato, servirà a mantenere l'icona in piedi
tagliate un pezzo di gros grain più lungo del rettangolo di 15 cm e incollatelo sul rettangolo

Paint the back of the pressed cardboard
Glue the rectanguar piece at the back of the pressed cardboard
glue the gros grain at the front of your shape
It's just like a frame
now it's time to glue the printed icon onto the shape and you've done

Dipingete il retro della sagoma e incollateci il rettangolo
ora incollate l'altra l'estremità del gros grain sul davanti della sagoma
è come una cornice!
Incollate ora il poster dell'icona sul davanti della sagoma, è fatta!


Now pierce the icon image wherever you want and place your jewellery into these holes
Your new jewellery holder is ready!


Con una puntina bucate la sagoma dove volete e infilateci i vostri gioielli, il vostro nuovo porta gioielli è pronto!


Here's the iconic jewellery holder packed and ready to make a little gift for my favorite cousin!
Ed ecco il portagioielli incartato e pronto per essere donato alla mia cuginetta preferita!
Sunday, September 25, 2011

What if sidereal space was a jewel?


The diamond is something perfect both for its brightness and cut. The necklace was born to emphasize the shape of a diamond, a stone bright as the stars. It is set at the centre with four mirrors reflecting its light around the space. They give a tridimensional dimension to the necklace and they look a little bit like solar panels.
The inspiration is both the sidereal space and the future. The bracelet is obtained with the repetition of a simple shape and it reflects all the rainbow colors when explose to the light.
What do you think of the result?


Il diamante è la perfezione: per lucentezza e taglio. La collana nasce con l'idea di dare risalto alla forma del diamante,una pietra luminosa come le stelle. E' posto al centro della collana con quattro specchi che ne riflettono la luce. Danno tridimensionalità alla struttura e l'aspetto di un satellite. L'ispirazione è sia lo spazio profondo che il futuro. Il bracciale è ottenuto come ripetizione di un elemento base e riflette i colori dell'arcobaleno quando è esposto alla luce. Che ne pensate?


the inspiration: satellites, shiny stars, the future,diamonds
Sunday, September 18, 2011

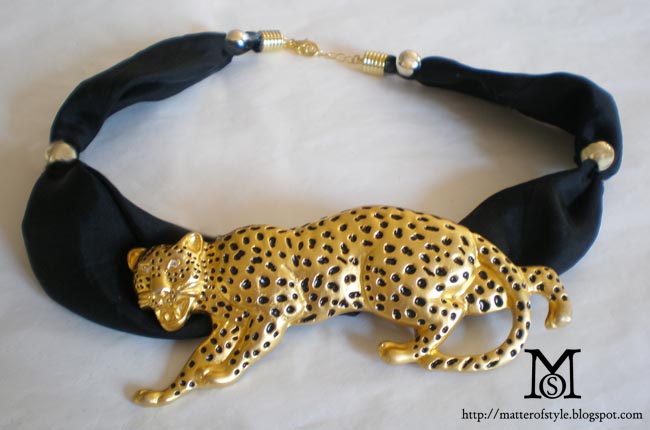
Leopard scupture necklace DIY


I couldn't stop thinking at Raspini's necklace. How could I make a similar one on a budget? One day the answer came into my mind: using a belt buckle! They come in various shapes and I chose this gold leopard to adorn my neck. I used a piece of fabric and a few beads to make the collar and then I added a closure!

La collana di Raspini è un vero capolavoro! Con un po' di ingegno e creatività si può realizzare una collana altrettanto imponente con una fibbia per cintura. Le fibbie per cintura sono disponibili in molte forme, io ho scelto questo leopardo dorato come centrale. Ho poi utilizzato un ritaglio di stoffa e una manciata di perle dorate per realizzare il resto della collana.


the belt buckle
I folded the piece of fabric

I inserted the fabric into the buckle and blocked it with metallic wire
I added the beads  
and the closure is the final touch!
Friday, September 2, 2011

DIY idea: the unexpected jewellery holder


Take all your vintage pendants and brooches and sew them one after another to make this unusual jewellery holder! This one is from Chanel 2008 collection. Too difficult? An eaasier version of this jewelled top can be to pin all the vintage brooches onto a nude or pink top, the wow effect is assured!
Saturday, August 20, 2011

Studded statement jewelry DIY


I am loving so much my new shoes that looking at them again and again I had the idea of making a statement jewel inspired by them.  For this jewel I used bias tape. I've studded it and then sewed it. What do you think of the result?
I hope you are all enjoying your holidays!


Le mie scarpe si sono trasformate in una fonte di inspirazione per un nuovo gioiello. Ho usato lo sbieghino, ho aggiunto le borchie e poi l'ho cucito. Che ne pensate?
Spero che vi stiate godendo qualche giorno di riposo, Buone Vacanze a tutti!
Saturday, July 30, 2011

Matter Of Style goes on tour de France


This summer my good friend Daniela is on a very adventurous vacation: leaving from the frontier between Italy and France she'll ride with her bicycle across the south of France to arrive in Paris. After visiting the cité de l'amour she'll make her way back to Italy. During her trip she'll stop in local markets to show her beautiful watercolor paintings and a few of my handmade jewels. She's taking Matter Of Style on a tour de France! So this summer you'll may find these Matter Of Style earrings across France. If you like them,don't worry,it's not going to be a treasure hunt, Daniela will keep me updated and i will inform you of dates and locations with twitter (they aren't fixed, the brave girl has to reach the location against bad weather and fatigue :) sorridente ).

Thanks Daniela and Bon Voyage!


Questa estate la mia amica Daniela vivrà una vacanza veramente avventurosa. Partendo dal confine attraverserà il sud della Francia in bicicletta per arrivare a Parigi. Dopo aver visitato la cité de l'amour farà di nuovo rotta verso l'Italia. Durante il viaggio si fermerà nei mercatini locali per mostrare i suoi bellissimi acquerelli e porterà con sè anche qualche gioiello artiginale Matter Of Style. Se dovessero piacervi e vi trovaste sul suolo francese vi terrò aggiornate su date e location dei mercatini su twitter. 
Grazie Daniela per aver deciso di portare Matter Of Style in tour e Bon Voyage!
Wednesday, July 27, 2011

In bloom: earrings DIY

these make me think at water lily
these are like pearl shells
Cherry blossom inspired me these three pair of earrings.
Sunday, June 26, 2011

DIY Dior inspired spring flowered necklace


the inspiration: Dior necklace 

  
what do you need? 
artificial flowers
gros grain in various colors (i used white,baby pink and purple)
pink satin ribbon

avrete bisogno di:
fiori in stoffa
gros grain in vari colori
un nastrino di raso per il fiocco
pull  out the plastic pistil
estraete il pistillo in plastica,basterà tirare
sew the petals together and cover the hole left by the pistil with some beads
ricomponete il fiore cucendo i petali uno sopra l'altro e usate qualche perlina per coprire il foro del pistillo
 stitch the white gros grain without blocking the thread at the end
eseguite una cucitura sul gros grain bianco senza bloccare il filo
and gently pull the thread, you'll see some ripple will form
tirate poi il filo e noterete che il nastro si arriccerà


stitch the white gros grain over the pink one
cucite il nostro bianco sopra quello rosa

now stitch the purple gros grain as shown and then press the pleats down with the iron.
I've finished the necklace stitching a row of silver beads between the pleats and then i've added a long satin ribbon at the back of the necklace, you'll fasten the necklace with a fancy bow.

a questo punto cucite il nastro viola come mostrato in figura e poi schiacchiatelo con il ferro da stiro in una direzione ottenendo delle pieghe. Ho completato la collana aggiungendo delle perline argentate tra le pieghe e un nastro di raso sul retro della collana che rifinisce e serve ad allacciare la collana con un fiocchetto.


Thursday, June 23, 2011

DIY idea: neon chains


Turn chains neon with spray paint can be a good idea to bring old bag handles,bracelets or belts directly in the new season. Put your chains over a newspaper,go in an open place and spray the paint. Let the chains dry,then spray a trasparent sealer to avoid the paint to rub off. We prefere spray paint every time we have to paint a tridimensional object with tiny hidden spots that wouldn't be easy to reach with a paintbrush.


Spruzzare di vernice in colori neon delle catenelle può essere una buona idea per catapultare vecchie tracolle,bracciali o cinte nella nuova stagione. Mettete le catenelle su un foglio di giornale e spruzzatele di vernice in un luogo aperto. La vernice spray è una ottima alternativa al pennello quando dobbiamo dipingere qualcosa di tridimensionale con angoli nascosti. Una volta asciutta una spruzzata di plastificante trasparente ed il gioco è fatto!


Wednesday, June 1, 2011

DIY idea: reclycled paper earrings


How cute are these jewels made of reclycled materials! They come from Rebekah’s ‘The Pretties’ Cargoh shop. They're very easy to do:only few pages from books or magazines are needed. Cut some strips from your pages and then slice the paper. Now roll the strips to obtain a tassel or open the fringes to make a nice flower! Glue the embellish on the base of a ring or add hooks to obtain an unconvetional pair of earrings!


Guardate che carini questi gioielli fatti di carta riciclata! Sono in vendita qui. Sono d'effetto e molto semplici da realizzare. Avrete bisogno solo di alcuni fogli di carta per realizzarli presi da un libro o da qualche rivista. Tagliatene delle striscie e poi sfrangiateli. Arrotolate e incollate poi la striscia per ottenere nappine o aprite le frangie per ottenere dei bei fiori. Infine incollate l'ornamento sulla base di un anello o attaccateci dei gancetti per realizzare gli orecchini!
Related Posts Plugin for WordPress, Blogger...

Popular Posts

Total Pageviews

My Zimbio My Ping in TotalPing.com

About Me

My Photo
Youth Pangkahkulon
View my complete profile