Followers

Powered by Blogger.
Showing posts with label belt diy. Show all posts
Tuesday, November 1, 2011

DIY idea: message mask

outside Mulberry show via Street Peepers

A giant and funny eyemask for those who like to draw attention. It can be done cutting the shape out of a plastic sheet. Once it's ready you can attach an elastic to it or glue it over a pair of sunglasses.

Per chi non ha paura di osare ecco una mascherina che riporta un messaggio. Per realizzare questo accessorio sopra le righe vi basterà ritagliare una forma da una copertina in plastica. A questo punto potrete legarci un elastico o incollarla su un paio di occhiali.
Saturday, October 15, 2011

Versace nails DIY


Today my manicure is inspired by Versace. I firsty applied a mint green base and then I decorated it with a bronze color (it's a little sparkly and glittery). I made the decorations using a pin (yes for sewing). I dip it into the bronze color and I drawn the greek fret. I added a few dots on top to look like mini studs. Do you like it?

La manicure di oggi è ispirata a Versace. Ho applicato un primo strato di verde menta che ho poi decorato con un color bronzo leggermente luccicante. Per fare le decorazioni ho utilizzato uno spillo imbevuto nello smalto. Ho disegnato la greca e ho poi aggiunto dei piccoli pois al di sopra di essa come fossero delle micro borchie.
Friday, October 14, 2011

Aviator sunglasses DIY tutorial


Here's the aviator sunglasses tutorial. I hope you'll like it!
Ecco a voi il tutorial su come realizzare gli occhiali, spero vi piaccia!


Let's start with the supply needed:
  • a pair of aviators
  • white leather (surprisely I found the right leather in a belt! I know it may sound cruel but I had to cut it out! )
  • metallic wire
  • glue
Cosa ci serve?
  • un paio di occhiali
  • della pelle bianca (io l'ho ricavata da una cinta!)
  • filo metallico
  • colla


Let's make the pattern. Take a piece of paper and press it along the edge of your glasses, you'll obtain an imprint of their shape.

Per fare il modello: prendete un foglio di carta e premetelo lungo il profilo laterale degli occhiali, noterete che la curvatura degli occhiali rimarrà impressa.

This is the right curvature, it will ensure a good fit around the glasses. Trace it and close the shape(it looks like a sail) you can use the shape I drew for reference.
Pin the pattern over the leather and cut it out a little bigger than your pattern.
Hem it.
I have handquilted my shape (unfortunately my sewing machine can't sew leather!)but this step is optional.

La giusta curvatura vi garantirà una corretta adesione all'occhiale. Ricalcate con una penna la parte curva e chiudete la forma, usate il mio modello come riferimento. Appuntate il modello sulla pelle e ritagliatela, appena più grande della forma di carta e fategli l'orlo.
Io ho decorato la forma con una trapuntatura a mano ma questo step può essere tranquillamente saltato.


Now the big question: how can we keep in shape the sail? And the answer takes us to the fun part. Take a metallic wire and insert it into the hem of your shape. Now shape the piece of leather around the glasses.

Ora la domanda è: come far mantenere la forma al pezzo in pelle? La risposta ci porta alla parte divertente del tutorial. Prendete un filo metallico e infilatelo nell'orlo appena fatto. Ora potete dare la corretta forma alla "vela".
Now the project is almost over. Take your shaped sails and glue them onto the sidepart of the sunglasses in one point. In order to cover the glue, cut a small piece of leather (it can be any shape, I chose the first letter of my name to make it more customized but you can choose to glue a nice button too)  and glue it where the glue is showing and you've done!

A questo punto avete quasi finito. Incollate la forma sulla stanghetta degli occhiali in un punto. Tagliate un altro pezzetto di pelle e incollatelo nel punto di incollaggio per evitare di mostrare la colla (potete ritagliare la vostra iniziale o qualunque altra forma, oppure incollarci un bottone!) e gli occhiali sono pronti!
Monday, September 5, 2011

Chanel aviators


These Chanel sunglasses are an unusual take on the classic aviator design. The details that hit my imagination are the lambskin leather blinkers;if fact they are removable. We can customize our sunglasses too creating decorations that can be inserted and removed into the sunglasses arms to our taste.
I visited Chanel.com recently and I really liked a couple of videos that show how Chanel sunglasses come to life so I wanted to share them with you. Enjoy.

Questi occhiali di Chanel sono una riuscita rivisitazione del classico modello "aviatore". Il dettaglio che più mi colpisce è la decorazione in pelle ai lati: è rimovibile. Possiamo personalizzare anche noi i nostri occhiali, creando delle decorazione che possano essere inserite e sfilate dalle stanghette degli occhiali a nostro piacimento!
In questi giorni ho visitato Chanel.com e ho molto apprezzato un paio di video che mostrano come gli occhiali Chanel prendono vita dalla creazione all'inscatolamento così ho pensato di condividerli con voi, buona visione.

The Creation


The secrets

Friday, August 26, 2011

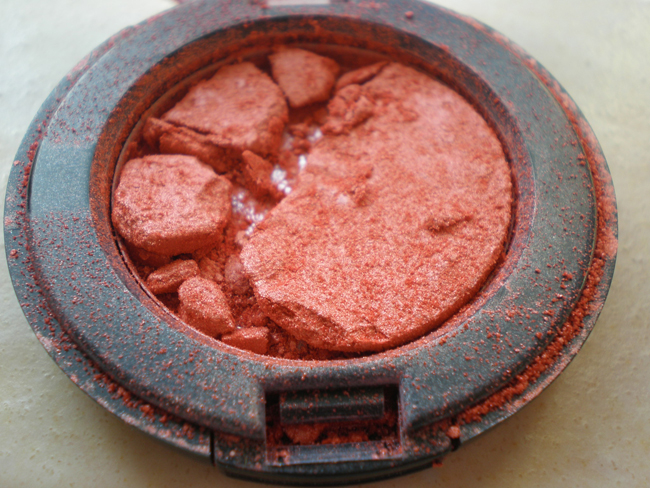
How to fix a broken eyeshadow

 How many times happens to break an eyeshadow? We have to clean everything up and then tens of dollars go into the trash. Just few days ago I have broken an eyeshadow in my favorite shade of green  and I thought: is it possible that it can't it be fixed? It's only pressed powder. So I searched for a tutorial on the internet and  I found the solution!


Siamo lì che ci trucchiamo, un attimo di distrazione ed ecco che l'ombretto cade per terra rompendosi in mille pezzi. Così decine di euro finiscono nel cestino. Proprio l'altro giorno senza volerlo ho rotto un ombretto della sfumatura di verde da me preferita e ho pensato che alla fine è solo polvere pressata, possibile che non si possa riparare?
Così ho cercato la soluzione su internet e credo di averla trovata!


 you only need a few drops of alcohol
avete bisogno solo di qualche goccia di alcol
pour the alcohol into the eyeshadow
versate qualche goccia di alcol nell'ombretto

take a piece of tissue paper and press down over the powder with a flat surface (ideally big as the eyeshadow), really press!

prendete un pezzetto di carta o di stoffa e premete la polvere con una superficie piatta, io ho usato un tappo di bottiglia,premete con forza
the powder is now well pressed

ed ecco la polvere  nuovamente pressata

I tried again with again with the orange eyeshadow
i'll leave them open for a few days to allow the alcohol to evaporate

lascerò gli ombretti all'aria qualche giorno per permettere all'alcol di evaporare completamente

I'm pretty satisfied with the result, I've turned the eyeshadow upside down and the powder stayed in place.
Here's the full video that teached me this technique:

Il metodo funziona, anche capovolti gli ombretti  mantengono la forma
Qui sotto trovate il video dal quale ho imparato questa tecnica


Sunday, July 31, 2011

Prada baroque sunglasses DIY (plus matching earrings)


a pair of sunglasses i wanted  blue ones
polymer clay (this one dryes open air)
blue and white acrylic color

un paio di occhiali da sole
pasta sintetica
acrilico blue e bianco

Prada baroque sunglasses
 i've used a piece of pressed cardboard for the decors on the bolts

per  i decori sulle stanghette ho usato del cartone pressato

i've molded the decors watching Prada pictures and  pressed them on the frame to ensure a good fit once glued.

ho modellato i pezzi guardando le foto e le ho poggiate sugli occhiali premendole leggermente per assicurare una buona aderenza una volta incollati.

then painted them and glued with a strong glue.
I've also made a pair of matching earrings (i know sunglasses were bold enough alone but i couldn't resist).
I've punched the piece and added a hook;one curl up, other one down to frame the face,like inverted commas.
These sunglasses make me think at vacations by the sea and painted tiles.
If i will ever make another pair i'd cut the shapes from colored plastic sheets i couldn't find this time,for a more flat and even result.

A questo punto li ho dipinti e incollati.
Ho anche fatto un paio di orecchini coordinati (lo so già gli occhiali sono vistosi ma non ho resistito).
Ho bucato il decoro e aggiunto un gancetto; un ricciolo in sù,l'altro in giù come due virgolette che incorniciano il visto.
Questi occhiali mi fanno pensare al mare e alle maioliche dipinte.
Se ne dovessi fare un altro paio taglierei le forme da dei fogli di plastica colorata che però questa volta non sono riuscita a trovare.


Thursday, July 7, 2011

DIY idea: fruity nails

Wednesday, June 29, 2011

DIY ombrè nails

two colors of your choice and the top coat
due colori a vostra scelta e il top coat


 start applying one color on your nails and let it dry
stendete il primo colore e lasciatelo asciugare


apply the second color at the end of the nail and before it dries apply the top coat insisting with the brush at the point where one color changes in the other you'll see the 2 colors blending together
if you don't get it right the first time keep trying!

 applicate il secondo colore sulla punta dell'unghia e prima che si asciughi stendete il top coat. Ripassate più volte sulla linea di separazione tra i due colori e noterete i due colori mescolarsi.


here's the two colors blended,the effect should be one color changing into the other and the ombrè manicure is done!

ecco i due colori mescolati, l'effetto che dovreste ottenere è l'illusione di un colore che sfumi nell'altro e la vostra manicure è finita!
Thursday, June 23, 2011

DIY idea: neon chains


Turn chains neon with spray paint can be a good idea to bring old bag handles,bracelets or belts directly in the new season. Put your chains over a newspaper,go in an open place and spray the paint. Let the chains dry,then spray a trasparent sealer to avoid the paint to rub off. We prefere spray paint every time we have to paint a tridimensional object with tiny hidden spots that wouldn't be easy to reach with a paintbrush.


Spruzzare di vernice in colori neon delle catenelle può essere una buona idea per catapultare vecchie tracolle,bracciali o cinte nella nuova stagione. Mettete le catenelle su un foglio di giornale e spruzzatele di vernice in un luogo aperto. La vernice spray è una ottima alternativa al pennello quando dobbiamo dipingere qualcosa di tridimensionale con angoli nascosti. Una volta asciutta una spruzzata di plastificante trasparente ed il gioco è fatto!


Saturday, May 7, 2011

DIY idea: hippy vibe


Hoping spring finally decides to come we can treat ourselves with some hippy inspired accessories.
I have seen a lot of fun headbands around so why don't make one? We can start with an elastic band and then add details to it like flowers and feathers.We can sew a piece of fabric on the elastic and then glue over it our desired embellishes or we can stick fake flowers with safety pins over the elastic for a last minute headband.
Not fancy wearing an headband? Try the rope belt with a flower instead of a buckle for a young, fresh look.


Sperando che la primavera alla fine arrivi veramente possiamo divertirci ad indossare qualche accessorio hippy. Le fasce per capelli sono tornate di moda,perchè non realizzarne una personalizzata?
Possiamo cominciare con un semplice elastico al quale possiamo cucire un pezzetto di stoffa che funga da base e poi incollarci sopra fiori finti e piume. Oppure fissare i fiori sull'elastico con delle spille da balia realizzando la fascia in pochissimo tempo.
Se indossare una fascia vi sembra troppo impegnativo provate allora la cinta di corda fissata con un fiore, per un look divertente e sbarazzino.
Saturday, April 30, 2011

DIY ideas for Gucci tassel belt

http://2.bp.blogspot.com/_Ft-n08M2lmA/TS9t6UZRKUI/AAAAAAAAASg/S5UwcDzN1uM/s1600/Gucci.jpg


Gucci tassel belt is one of the most sought after accessory of the season.
To copy the look you can just knot a curtain rope with tassels over a waist belt but if you're feeling crafty and want to own a belt like this one follow me.
This belt doesn't have any buckle and it's fastened with a rope that goes through loops and it's knotted on the front.
If we start with a regular belt we have to add loops to it.
Here's a couple of ways to make them starting from the easier.

guccibelthowtocopy.jpg
guccibelthowto2copy.jpg
now we have to make a tassel with a piece of leather
you just have to take a rectangular piece of leather or suede and slice it almost till the top and then fold it and glue it around the rope end.

Make_slits_large


These are some ideas on how to make this belt.
I'll make a step by step tutorial in the next few days, i just have to find a nice gold belt! :)
If you find this too complicated just go to the nearer H&M and get the belt below for £7.99,click here to see the item details.

https://blogger.googleusercontent.com/img/b/R29vZ2xl/AVvXsEgTTcpmPUUhWAfYtW3UgMzsHa_Lz9b06a4GGKqr3gqXuqg2L3OgUYi7_TZR_FqQ4JzOpGXnA71AstJzJxOTx419rR__4r_RRpDblhOg_n7-1HgxD99aY8e_M_x1uxbCvFrr0znK-Pg3jVE/s1600/DXLA55_81667_04000_96_4307.jpg


ehi, i just found another inspired belt, this time from asos check it here

:
Thursday, April 21, 2011

DIY inspiration: the scarf top

hermesscarf2.jpghermesscarf2-A.jpg
hermesscarf1.jpghermesscarf1-A.jpg
hermesscarf3.jpghermesscarf3-A.jpg

hermesscarf5.jpghermesscarf5-A.jpg

hermesscarf4.jpghermesscarf4-A.jpg

Hermes scarves are beautiful but very expensive. The maison started to produce these cards to show customers why their foulards are worth a buy:because they can be easily turned in a variety of clothes.
This spring is all about prints so scarves with their bold colors and patterns can make a fantastic top or accessory.
Try these easy folding and knotting tecniques and make your own top!
Now click here if you want to know how to make a bag out of a scarf.


I foulard di Hermes sono bellissimi ma decisamente costosi. Forse per convincere i potenziali consumatori all'acquisto Hermes ha cominciato a stampare questi cartoncini che mostano come con poche semplici mosse si possono ottenere top o accessori a partire dai loro famosi foulard.
Questa primavera le stampe colorate sono un must quindi i foulard, disponibili nelle fantasie più sgargianti, sono un ottimo modo di ottenere un top alla moda!
Provate anche voi!
Ora se volete vedere come ottenere una borsetta da un foulard cliccate pure qui!
Related Posts Plugin for WordPress, Blogger...

Popular Posts

Total Pageviews

My Zimbio My Ping in TotalPing.com

About Me

My Photo
Youth Pangkahkulon
View my complete profile